
If you’re wondering how to screenshot on Windows, look no further because here at Gear Nuke, we’ve got all the shortcuts and details to help you capture your screen like a professional. You’ll be pleased to hear that there’s a wide range of options if you’re looking to learn how to screenshot on a Windows laptop or PC, and once you’ve got the hang of it, finding the perfect function for the content you’re looking to capture is a breeze.
As well as the ability to capture a typical screenshot, you can access the full range of options for screen capture through the Snip & Sketch app found natively on Windows Machines. Before we get into it, it’s also important to mention that older versions of Windows prior to Windows 10 may feature slightly different methods and tools for screenshotting, such as the precursor to Snip & Sketch, the Snipping Tool.
-
- How to take a full-screen screenshot
- How to open the Snip & Sketch Tool
- How to take a partial screenshot with Snip & Sketch
- How to screenshot a free form area of the screen with Snip & Sketch
- How to screenshot a specific window or menu with Snip & Sketch
- How to find your screenshots on Windows
- How to edit your screenshots on Windows

How to take a full-screen screenshot on Windows
To copy and paste the entire screen as an image
- Press PrtScn to save a picture of the whole screen to your clipboard
- Ctrl + V to paste it where you would like
To copy and save the entire screen as an image
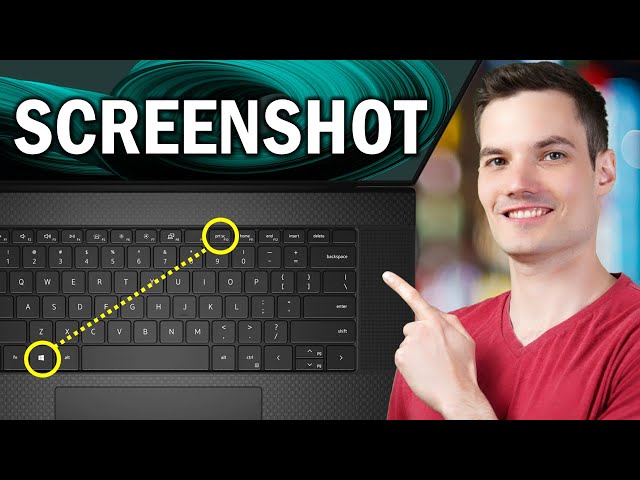
- Press the Windows Key + PrtScn
- Find the image in the Screenshots folder
To copy and save the entire screen as an image (no PrtScn key)
- Press the Windows Key + FN + Spacebar
- Find the image in the Screenshots folder
How to open the Snip & Sketch Tool
- Press the Windows key and search Snip & Sketch
- Alternatively, press Windows Key + Shift + S
It’s worth noting that the Snip & Sketch overlay differs to the Snip & Sketch app. In the Snip & Sketch overlay, the capture will copy to your clipboard, and you can press Ctrl + V to paste it into your app of choice. In the Snip & Sketch App, it will appear as a preview in the app itself, which you can then save directly to your machine.
How to take a partial screenshot with Snip & Sketch
- Open Snip & Sketch by pressing the Windows Key + Shift + S
- Click and drag the cursor to capture a rectangular shape
- Release the cursor to take the snip.
How to screenshot a freeform area of the screen with Snip & Sketch
- Open Snip & Sketch by pressing the Windows Key + Shift + S
- Select the Freeform Snip mode
- Click and hold the cursor to create a freeform shape around your desired object.
- Release the cursor to take the snip.
How to screenshot a specific window or menu on the screen with Snip & Sketch
- Open Snip & Sketch by pressing the Windows Key + Shift + S
- Select the Window Snip mode
- The Window or Menu your cursor is on will be highlighted
- With your cursor on the desired window or menu, click to capture the screenshot
How to find your screenshots on Windows
There are a few ways to find your screenshots on Windows, depending on how you’ve taken the capture. If you’ve taken a full screen screenshot with Windows key + PrtScn, you’ll find it in This PC > Pictures > Screenshots, saved as a PNG.
If you’re using the Snip & Sketch overlay, the capture will be in your clipboard, ready to be pasted with Ctrl + V into your app of choice. If you’ve used the Snip & Sketch app, you’ll be presented with the preview of your capture, and you can save it with the floppy disk icon in the top right of the app. This will save the capture to This PC > Pictures as a PNG.
How to edit your screenshots on Windows
Microsoft’s Snip & Sketch app is a great way to edit your screenshots. Using this program over the shortcut overlay will provide you with a preview of your capture and a series of customization features like the ability to crop or annotate your capture.
If you’re someone who edits screenshots frequently you can pin the Snip & Sketch app to your taskbar for easy access. Of course, you can also save or paste your captures into image editing software like Paint or Photoshop, if you want to edit with more depth.